How to create and configure a Windows service with Topshelf and Ninject?
This article aims to present how it is possible to easily create and configure a Windows service with Topshelf and Ninject using dependency injection.
Topshelf NuGet is a package for encapsulating a classic console application in a Windows Service.
Ninject is also a NuGet package is container IOC to implement dependency injection.
Step 1, create a console application project and download packages via the management console :
PM > Install-Package Topshelf
PM > Install-Package Topshelf.Ninject
Step 2, define / service(s) interface(s) and the implement service to what the windows service depends on :
namespace TopShelfWindowsService.Services
{
   public interface IMyService
   {
       void DoWork();
   }
}
public class MyService : IMyService
{
   public void DoWork()
   {
      //Do something
   }
}
Step 3, implement a module inheriting from “ModuleNinject” in order to register the concrete classes implementing interfaces used for injection
I recommend the lifecycle Singleton for objects, here is how to declare them when recording classes :
using Ninject.Modules;
using TopShelfWindowsService.Services;
namespace TopShelfWindowsService
{
   public class IocModule : NinjectModule
   {
      // Bind Interfaces to implementations for dependancy injection
      public override void Load()
      {
         Bind<IMyService>().To<MyService>().InSingletonScope();
      }
   }
}
Step 4, implement the windows service deriving from the “ServiceControl” interface in the namespace “Topshelf”
I also propose an implementation of a timer that allows to execute a service all X seconds, while ensuring executes only one service at a time, through the static class “Monitor”.
By implementing the “ServiceControl” interface, it’s mandatory to implement the methods “Start” and “Stop”
using System.Threading;
using System.Timers;
using Topshelf;
using TopShelfWindowsService.Services;
using Timer = System.Timers.Timer;
namespace TopShelfWindowsService
{
   public class MyWindowsService : ServiceControl
   {
      private Timer _syncTimer;
      private static object s_lock = new object();
      private IMyService _myservice;

      // Constructor
      public MyWindowsService(IMyService myService)
      {
         _myservice = myService;
      }

      // Starts the windows service
      public bool Start(HostControl hostControl)
      {
         _syncTimer = new Timer();
         _syncTimer.Interval = 5000;
         _syncTimer.Enabled = true;
         _syncTimer.Elapsed += RunJob;
         return true;
      }

     // Stops the windows service
     public bool Stop(HostControl hostControl)
     {
        _syncTimer.Enabled = false;
        return true;
     }

     // Job runner event, with lock if the job still running
     private void RunJob(object state, ElapsedEventArgs elapsedEventArgs)
     {
        // Prevents the job firing until it finishes its job
        if (Monitor.TryEnter(s_lock))
        {
           try
           {
              _myservice.DoWork();
           }
           finally
           {
              // unlock the job
             Monitor.Exit(s_lock);
           }
        }
     }
   }
}
Step 5, implement the entry point at the start of the windows service in a console application through Topshelf : Here we will set the use Ninject for dependency injection, and the name of windows service, description ….
using Topshelf;
using Topshelf.Ninject;
namespace TopShelfWindowsService
{
   class Program
   {
      static void Main(string[] args)
      {
         HostFactory.Run(x => {
            x.UseNinject(new IocModule());
            x.Service(s =>
            {
               s.ConstructUsingNinject();
               s.WhenStarted((service, hostControl) => service.Start(hostControl));
               s.WhenStopped((service, hostControl) => service.Stop(hostControl));
            });
            x.RunAsLocalSystem();
            x.SetDescription("Prototype .NET TopShelf Windows Service");
            x.SetDisplayName("Prototype_TopShelf_and_Ninject");
            x.SetServiceName("Prototype_TopShelf_and_Ninject");
        });
      }
   }
}
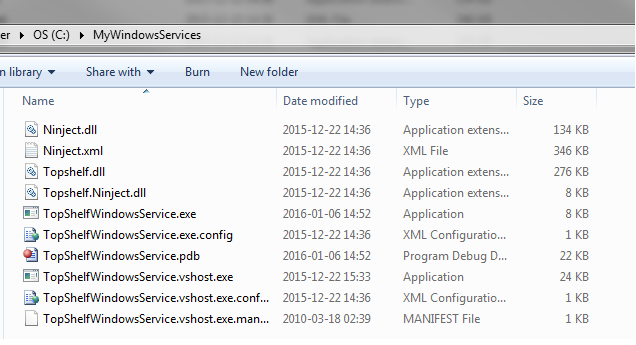
Step 6, deploy the windows service :
Once the windows service is functional, move it (the config file, dlls and exe generated at compile time) to a directory on your machine.
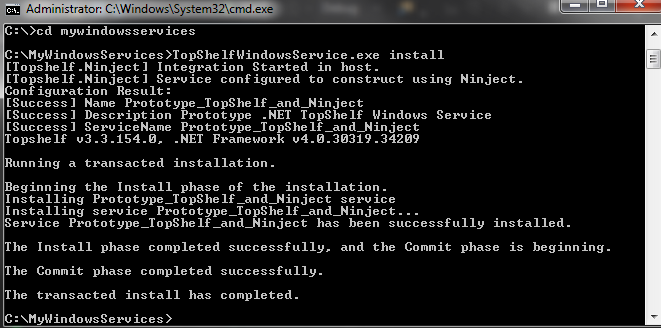
Then, in the command line, go to the directory that contains dlls and then run the install as follow :
nom_de_l_executable.exe install
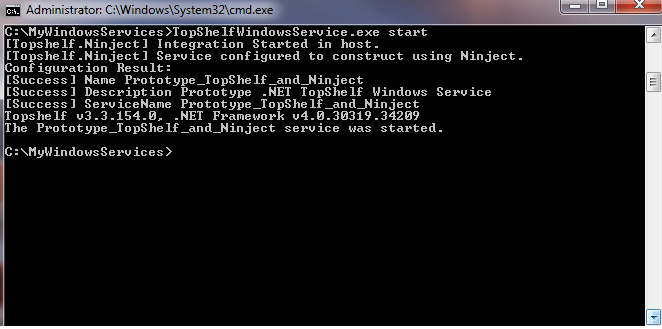
Start it as follow :
nom_de_l_executable.exe start
You can also stop the service and uninstall it :
nom_de_l_executable.exe stop
nom_de_l_executable.exe uninstall
Samples :