Common features in ASP.NET Core 2.1 WebApi: Validation
- Common features in ASP.NET Core 2.1 WebApi: Authenticating with a JWT
- Common features in ASP.NET Core 2.1 WebApi: Validation
- Common features in ASP.NET Core 2.1 WebApi: Error handling
- Common features in ASP.NET Core 2.1 WebApi: Logging
- Common features in ASP.NET Core 2.1 WebApi: Testing
- Common features in ASP.NET Core 2.1 WebApi: Documenting
- Common features in ASP.NET Core 2.2 WebApi: Profiling
- Common features in ASP.NET Core 2.2 WebApi: Caching
- Common features in ASP.NET Core 2.2 WebApi: Mapping
Introduction
Validating user input is a common scenario in a Web-based application. For production applications, developers often end up spending a lot more time and code on this task than we would like. In building the ASP.NET Core Web API with FluentValidation, it was important to try and make the task of validating input a lot easer than it has been in the past.
FluentValidation is popular .NET library for building strongly-typed validation rules.
Configuring the project
Step 1: Download FluentValidation.AspNetCore Nuget package
PM> Install-Package FluentValidation.AspNetCore -Version 8.0.100
Step 2: Add FluentValidation in Startup.cs
public void ConfigureServices(IServiceCollection services)
{
   // mvc + validating
   services.AddMvc().SetCompatibilityVersion(CompatibilityVersion.Version_2_1).AddFluentValidation();
}
Creating a validator
FluentValidation ships with several built-in validators. In ths next example will see how to use two of them:
- NotNull
- NotEmpty
We will see how to build a custom validator as well with the RuleBuilder Must.
Step 1: Create a model you want to validate
Example of User model:
public class User
{
   public string Gender { get; set; }
   public string FirstName { get; set; }
   public string LastName { get; set; }
   public string SIN { get; set; }
}
Step 2: Create your validator
Note that your validator must inherit from the abstract class named AbstractValidator
public class UserValidator : AbstractValidator<User>
{
   public UserValidator()
   {
      // Rules here
   }
}
Step 3: Create your rules
In this example we will ensure that FirstName, LastName and SIN are not null and not empty, we will also ensure that SIN number is a valid SIN with this algorithm:
public static class Utilities
{
   public static bool IsValidSIN(int sin)
   {
      if (sin < 0 || sin > 999999998) return false;

      int checksum = 0;
      for (int i = 4; i != 0; i--)
      {
         checksum += sin % 10;
         sin /= 10;

         int addend = 2 * (sin % 10); if (addend >= 10) addend -= 9;
         checksum += addend;
         sin /= 10;
      }
         return (checksum + sin) % 10 == 0;
   }
}
Implementation of rules:
public class UserValidator : AbstractValidator<User>
{
   public UserValidator()
   {
      RuleFor(x => x.FirstName)
      .NotEmpty()
      .WithMessage("FirstName is mandatory.");

      RuleFor(x => x.LastName)
      .NotEmpty()
      .WithMessage("LastName is mandatory.");

      RuleFor(x => x.SIN)
      .NotEmpty()
      .WithMessage("SIN is mandatory.")
      .Must((o, list, context) =>
      {
         if (null != o.SIN)
         {
            context.MessageFormatter.AppendArgument("SIN", o.SIN);
            return Utilities.IsValidSIN(int.Parse(o.SIN));
         }
         return true;
      })
     .WithMessage("SIN ({SIN}) is not valid.");
   }
}
Step 4: Declare your rules as a singleton service in Startup.cs
public void ConfigureServices(IServiceCollection services)
{
   // Validators
   services.AddSingleton<IValidator<User>, UserValidator>();
   // mvc + validating
   services.AddMvc().SetCompatibilityVersion(CompatibilityVersion.Version_2_1).AddFluentValidation();
}
Step 5: Manage your validation errors in Startup.cs
ASP.NET Core 2.1 allows you to override the default behavior of ModelState management (ApiBehaviorOptions), you have now an alternative to MVC Attributes:
public void ConfigureServices(IServiceCollection services)
{
   // Validators
   services.AddSingleton<IValidator<User>, UserValidator>();
   // mvc + validating
   services.AddMvc().SetCompatibilityVersion(CompatibilityVersion.Version_2_1).AddFluentValidation();

    // override modelstate
    services.Configure<ApiBehaviorOptions>(options =>
    {
       options.InvalidModelStateResponseFactory = (context) =>
       {
          var errors = context.ModelState.Values.SelectMany(x => x.Errors.Select(p => p.ErrorMessage)).ToList();
          var result = new
          {
             Code = "00009",
             Message = "Validation errors",
             Errors = errors
          };
          return new BadRequestObjectResult(result);
       };
    });
}
When a validation fails, this piece of code is performed (ModelState is false)
Is this example, I manage what I do with errors and how I display errors to the client, simply an object that contains an error code, a message, and a list of validation errors encountered.
Here we are! Let’s see how it works now
Using a validator
It’s really easy to use a validator after it’s creation.
You just need to create your action that takes in parameter your model to validate.
Because the validation service added in your configuration, FluentValidation will automatically detect your model when you use it into an action and fire the validator !
Step 1: Create an action that uses your model to validate
[Route("api/[controller]")]
[ApiController]
public class DemoValidationController : ControllerBase
{
   [HttpPost]
   public IActionResult Post(User user)
   {
      return NoContent();
   }
}
Step 2: Test your action with POSTMAN
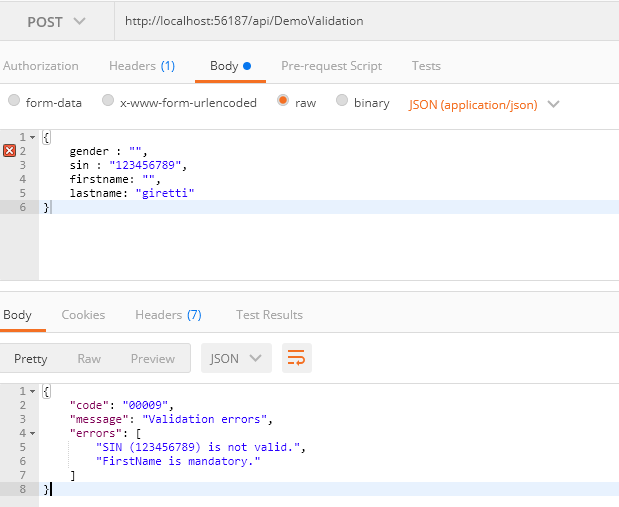
Conclusion
This was an example of implementing validation in an ASP.NET Core WebAPI 🙂
The complete source code can be found here.